 Help
Topics
Help
Topics

Home | Portfolio | Contact | Help Topics
Copy DVDs and Other Discs* with OS X Disk*
Copy/Utility
 The
following steps work for any removable media that is not copy-protected. That
means you can't use these techniques to copy most commercial DVDs. There are
tools available that will decrypt DVDs, however, but they may be illegal. Search
google or
VersionTracker
to find out more.
The
following steps work for any removable media that is not copy-protected. That
means you can't use these techniques to copy most commercial DVDs. There are
tools available that will decrypt DVDs, however, but they may be illegal. Search
google or
VersionTracker
to find out more.
If you own a Mac with a DVD burner (AKA "SuperDrive") or CD burner
(AKA "Combo Drive" or CD-RW) that's supported by Apple (i.e. it came
with your computer and/or it is "Apple-supported," like most Pioneer
drives), then proceed to the steps listed below for your operating system:
Note: DVD burners can burn either
DVDs or CDs, while CD burners can burn only CDs. Combo drives, however, can
make images of unprotected DVDs, but can only burn CDs.
If you don't know what operating system version is on your computer, then click
on the Apple menu in the upper-left of the screen and select "About This
Mac." Your Mac OS X version will be listed in the window that opens up
(see right).
If your DVD burner is not supported by Apple, then you'll probably be able
to enable support with PatchBurn.
Learn more and download PatchBurn
here. Although it's "unsupported" by Apple, PatchBurn works great
and is highly recommended.
Copy Discs with Mac OS X 10.3 and Higher (Panther, Tiger)
 |
- Insert the DVD or CD that you want to copy into the drive. If DVD
Player opens automatically, then quit it (Command-Q).
- Open the Disk Utility application (found in /Applications/Utilities).
- Select the disc (not just the disc session, which is listed
as a sub-section of the disc) you want to copy from the listing along
the left.
- From the Images menu, choose New
and the choose Image from "your disk name".
(Mac OS X 10.4 and later: From the File menu, choose
New and the choose Image from "your disk
name").
- Type a file name and choose "DVD/CD Master"
from the Image Format pop-up menu.
- Click the Save or Create button.
After the image has been created you should see it in the disk listing
in the Disk Utility window.
- Eject the original disc.
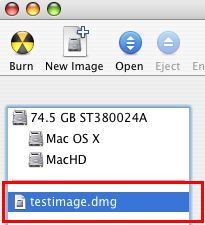
- Select the disk image you created from the list along the left og
the Disk Utility window (see left).
- Click the Burn icon in the toolbar. Later versions
of Disk Utility will use the ".cdr" extension instead of ".dmg."
- When prompted, insert a blank disc (DVD-R or CD-R, depending on if
the image came from a DVD or CD).
- Click the Burn button.
|
Copy Discs with Mac OS X 10.2.x (Jaguar)
- Insert the DVD or CD that you want to copy into the drive. If DVD Player
opens automatically, then quit it (Command-Q).
- Open the Disk Copy application (found in /Applications/Utilities).
- From the File menu, choose New and then
choose Image from Device.
- Select the disc (not just the disc session, which is listed as
a sub-section of the disc) you want to copy from the listing along the left.
- Type a file name and choose "DVD/CD Master" from
the Image Format pop-up menu.
- Click the Save button.
- After the image has been created, eject the original disc.
- From the File menu, choose Burn Image.
- Select the image you just created.
- Click the Burn button.
- When prompted, insert a blank disc (DVD-R or CD-R, depending on if the image
came from a DVD or CD).
- Click the Burn button.
Copy Discs with Mac OS X 10.0 through 10.1.5 (it's time
to upgrade, seriously**)
- Insert the DVD or CD that you want to copy into the drive. If DVD
Player opens automatically, then quit it (Command-Q).
- Open the Disk Copy application (found in /Applications/Utilities).
- From the Image menu, choose New Image from
Device.
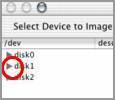
- Select the disc you want to copy from the listing.
You may need to click the disclosure triangle next to the disc to see
the disc you want to copy (see right).
- Click the Image button.
- Type a file name and from the Image Format pop-up
menu, choose DVD/CD Master.
- After the image has been created, eject the disc.
- From the Image menu, choose Burn Image.
- Select the image you just created.
- Click the Burn button.
- When prompted, insert a blank disc (DVD-R or CD-R, depending on if
the image came from a DVD or CD).
- Click the Burn button.
|
 |
*Ever notice how "disc" is spelled with
a "c" when referring to optical discs (CD, DVD, mini-disc), and "disk" is spelled
with a "k" when referring to other types of media? This document based on AppleCare
article number 42724.
**If your Mac isn't supported for 10.2.x or higher, then it's
still worth upgrading. Newer versions of OS X are superior in many ways to 10.0.x
and 10.1.x. In addition to new features, OS X versions 10.2 and up are noticeable
faster, even on an older Mac. Use XPostFacto
to install OS X on unsupported Macs. Download
XPostFacto here.
Last updated on the twelfth of June, 2005.
Please use this contact form to get in touch with me.