(and other cool stuff)
Mac OS X 10.2.1, SAMBA v2.2.3a
![]()
SAMBA tips for
Jaguar
October 15th, 2002
The most common question with Jaguar's "Windows File Sharing"
(SAMBA) is, "How do I share directories other than my home
directory?" There are two ways to do this. One involves
shareware. The other involves using the Terminal app. Other topics covered
on this web page are:
• Enabling login as the root user
• Adding sharing-only users who do not
have local home directories
• Related Links
Before you try either of these methods, make sure that Windows File Sharing is checked in the Sharing PrefPane in System Preferences.
Method 1: Shareware
Download the SAMBA Sharing Package. It adds a PrefPane to your System
Preferences. The PrefPane does exactly what I'll tell you how to do in
the Terminal app, which is to edit the smb.conf file. SAMBA Sharing package
can be downloaded here:
http://xamba.sourceforge.net/ssp/index.shtml
If you go this route, then just follow the directions provided with the
SAMBA Sharing Package. My work is done here.
Method 2: Terminal
This method can be used alone, or in combination with method 1 to give
you better control and more options. Do you know what the root user is?
If you don't, then you may want to try Method 1. However, since I'm a
teacher, I'll tell you.
[skip this paragraph if familiar with root user] To keep your computer secure from others, and to prevent accidental changes of files you shouldn't mess with, every *nix-based computer (Linux, UNIX, Solaris, etc.) accesses, reads, writes and runs each process (i.e. application), file or directory (folder) as a specific user. Most users on your computer aren't actual people, but exist within the operating system as means of limiting processes from wreaking total havoc on your files. The root user is the only user that has full access to the entire computer. Most processes do not run as root (i.e. with full access to the computer) because this would give them the ability to , for example, erase your entire hard drive. You can log into the Finder as the root user only after you enable it in the NetInfo Manager. Here we just use the Terminal app, which does not require you to do this. In Terminal, there are two commands that allow you to act as root, sudo and su. Another name for root is "super user," so sudo stands for "super user do," allowing you to do one thing as root, to execute one command at the command line. If you want to performa bunch of commands as root, then you use su, which lets you log in as root. You will stay logged in as root until you type exit, or close your Terminal session. The first time you log in as root, you'll have to provide your password and read a warning.
On to business. Open Terminal from Applications/Utilities. Below is a copy of my terminal session and my SAMBA configuration file, which specifies which directories you wish to share via SAMBA. The % or # sign represents the command prompt. You do not type that or anything to the left of it on the same line. Pico is a text editor (I use vi editor myself, but pico is easiere for first-timers). You will use a text editor to edit the file smb.conf in the etc directory. If you use pico, then use the arrow keys to move around & edit the file, then use the keyboard command ctrl X to exit, and y to save changes, or y to discard changes (see below). if you prefer vi, then you probably don't need my help:
Below is my smb.conf file. You may copy bits and pieces of the file below into your own smb.conf file. The lines beginning with a semicolon are comment lines. They are not read by SAMBA, and only serve to instruct / remind you how everything in here works. I added a bunch of comments for your benefit, noting where my additions began and ended. The rest of what's in this file is just as I found it set up by Apple. Please note the default comments/instructions at the top of the file. They clearly anticipated that folks like you and I would be looking at this. You may choose to add your own comments. Replace computername and username with your computer's name and with the name of the user who has privileges to access the specified shares.
[computername:~] username% su

          Password:

          [computername:/Users/username] root# cd /etc

          [computername:/etc] root# cp smb.conf smb.conf.bak

          [computername:/etc] root# pico smb.conf
; Template configuration file for smbd.

          ; ============================================================================

          ; For the format of this file and comprehensive descriptions of all
          the

          ; configuration option, please refer to the man page for smb.conf(5).

          ;

          ; The following configuration should suit most systems for basic usage
          and

          ; initial testing. It gives all clients access to their home directories
          and

          ; allows access to all printers specified in /etc/printcap. It also
          provides

          ; a public share point for generally exporting stuff.

          ;

          ; Some things to check out:

          ;

          ; 1: Make sure that the user specified in "guest account"
          exists. Typically

          ; this will be a user that cannot log in and has minimal privileges.

          ; Often the "nobody" account doesn't work (very system dependant).

          ;

          ; 2: You should consider the "security =" option. See a full
          description

          ; in the main documentation and the smb.conf(5) manual page

          ;

          ; 3: Look at the "hosts allow" option, unless you want everyone
          on the internet

          ; to be able to access the shares you export here.

          ;

          ; 4: If you want to support printers, add/uncomment the relevant entries.

          ;

          [global]

          client code page = 437

          coding system = utf8

          guest account = unknown

          encrypt passwords = yes

          ;

          ; Begin additions 9-2-02

          ;

          ; Uncomment the two lines below if your computer is connected to a

          ; network with a Windows NT domains with a primary domain controller.

          ; Replace NT.Server.ip.address with the actual IP address, e.g. 10.0.0.5,
          etc.

          ;

          ;workgroup = DOMAIN

          ;wins server = NT.Server.ip.address

          ;

          ; The netbios name is the same as the Computer name in the Sharing PrefPane.

          ; Uncomment below and change the netbios name if you want it to be different.

          ;

          ;netbios name = computername

          ;

          ; Change the following line to represent your network, as an added measure

          ; of security. This restricts the computer IP addresses that can access

          ; SAMBA shares. My network uses the 10.0.0.x address range, so I would
          uncomment

          ; the first hosts allow line. Choose the range appropriate for your
          network,

          ; or leave this section commented out for less security.

          ;

          ;hosts allow = 10.0.0.0/255.255.255.0

          ; OR

          ;hosts allow = 192.168.0.0/255.255.255.0

          ; And so on...

          ;

          ;

          ; Share the entire hard drive

          ;

          [drivename]

          path = /

          writeable = true

          admin users = username

          read only = no

          ;

          ; Share the Pictures folder

          ;

          [pictures]

          path = /Users/username/Pictures

          valid users = username

          read only = no

          ;

          ; End additions

          ;

          [homes]

          comment = User Home Directories

          admin users = username

          browseable = no

          writeable = true

          read only = no

          create mode = 0750

          ;[public]

          ; path = /tmp

          ; public = yes

          ; only guest = yes

          ; writable = yes

          ; printable = no

          ;[printers]

          ; comment = All Printers

          ; browseable = no

          ; printable = yes

          ; public = no

          ; writable = no

          ; create mode = 0700
In Pico, the commands are listed across the bottom of the screen. The
"^" symbol represents the control key. Hold down control
X when you're done. You'll be asked:
Save modified buffer (ANSWERING "No" WILL DESTROY CHANGES) ?
Answer Yes (y) if you want to save changes, or No (n) if you think you
made a mistake.
If you screw things up, then you can restore your backup copy as follows from the command line:
[computername:~] username% su

          Password:

          [computername:/Users/username] root# cd /etc

          [computername:/etc] root# mv smb.conf smb.conf.broken

          [computername:/etc] root# mv smb.conf.bak smb.conf
You will have to enable windows file sharing for each user in the Accounts PrefPane (you may have to re-enter the user password to encrypt it for SMB). The SAMBA documentation widely available on the Internet for detailed stuff in Linux works just fine for OS X - I learned much of my information from the book Samba for Dummies, which is targeted at Linux users, long before any documentation on OS X was available.
Sharing-Only Users | Top
of Page
If you want to create users who have no home directories (i.e.
sharing-only users), then install the SharePoints
prefpane (donation ware). If you use SharePoints instead of creating a
new OS X account, then I think you'll need to log in as root and use the
program smbpasswd to encrypt the SAMBA password, since
OS X won't do it for you automagically then. The syntax is smbpasswd
-a username, and you'll be prompted to enter a password for the
specified user. You can type man smbpasswd or man
samba at the command line for more info (type Q
to exit the man page).
Background | Top of Page
My help
topics site gets a pretty high ranking in Google, so people email
me with questions now and again. I have experience as a technology coordinator,
which is what they call a system administrator / teacher in the education
field. I worked at one school that had almost all Windows 98 PCs and a
few neglected Macs scattered about. The first year I was at the school,
four iMacs were donated to us and we also developed a technology plan
that called for wireless laptops with long battery life. We were lucky
enough to get a donor who funded a cart of twenty iBooks (graphite, clamshell
type), and we got another cart with twenty more a year later (white, 12"
screen, dual USB model)... So what were we to do with our Windows NT fileserver?
To make a long story short, we had to have a cross-platform solution for
our fileserver. The first batch of iBooks and iMacs arrived before OS
X server 10.0 was released, but it was due out shortly, so we bought a
G4/500/AGP server with OS X Server 1.2 on it, planning to upgrade as soon
as 10.0 server was released. For those of you unfamiliar with the OS X
Server 1.x series, it wasn't OS X at all, but rather some strange, thrown-together
mutant child of NeXt and Copland. I tinkered with OS X Server 1.2, but
it stunk, and we never put it into production. The first release of OS
X Server 10.0 also stunk, but it got a lot better by 10.1.x. This article
was written when we were running OS X Server 10.1.5, which is solid, but
lacks some features included with Jaguar Server (10.2). We now have OS
X Server 10.2, and I'll add some articles on that shortly.
Enabling the root user in the NetInfo
Manager | Top of Page
NetInfo Manager is found in the Utilities folder inside the Applications
folder on your hard drive.
• Open NetIfo Manager
• Click on the little lock icon in the lower left corner & enter
the administrator password (from the person who first set up the computer).
• Go to the Security menu and select Enable
Root User. Enter the root password twice.
• Save Changes and quit NetInfo Manager.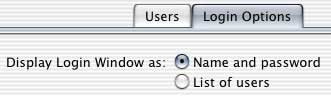
• Go to System Preferences... (in the Apple menu)
and open Accounts (Jaguar, 10.2.x) or Login
(earlier versions of OS X), then click on the Login Options
tab. Check Name and password (see right), because root
is never included in the list of users.
• You may now log out, then log in as root with the password you
entered in a previous step. Logging in as root is dangerous because you
could accidentally delete or modify files that you would otherwise be
prevented from messing with. You could potentially cripple your computer,
requiring you to re-install the operating system, erasing all your settings
(not your documents, however). On the other hand, it is sometimes necessary
to log in as root to fix things that can't otherwise be repaired (this
can be done from the Terminal without the above steps, but logging into
the Finder as root is often a lot easier).
Related Links | Top of Page
Please email
me any links that you think I should add to this section.
- CreativeMac.com - Networking Windows with Mac OS X, Part 2
- Samba.org
- Samba Sharing Package
- SharePoints